Google Timeline

Just discovered a cool feature of google search. I am sure I am the last person to find it, as I am usually a bit behind, but well … here it is anyway.  Google has a nice Timeline view of info about subjects. You can get this by adding a simple parameter and parameter value ( &tbs=tl:1) to the query string.

Google Address bar

when searching via Google, after entering your search text and running the search, if you modify the resulting HTTP query string and add in the parameter “tbs” and value “tl:1” , which looks like:  “&tbs=tl:1” and rerun that query (different depending on your browser but in most, if you just press the “Enter” key on your keyboard it will run it), you will then see a timeline like:


Google Timeline view


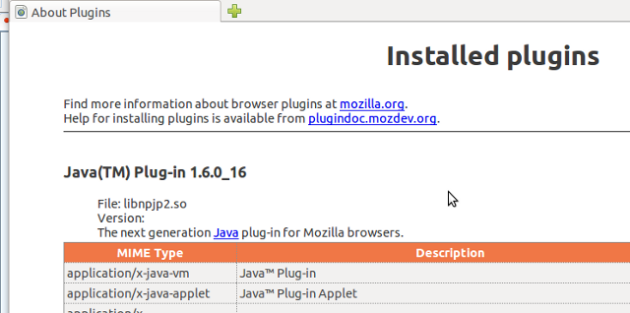
Install Firefox Java Plugin on Linux


about-plugins

This is silly but not super obvious and not easy to find on the interweb thingie searches come up with Oracle’s solution about linking the libjavaplugin_oji lib in the Mozilla plugins dir:

<Java installation directory>/plugin/i386/ns7/libjavaplugin_oji.so

which does not work for me. The way to get this going is to create a link to the libnpjp2 library in the Mozilla plugin directory as follows:

ln -s /<Java installation directory>/jre/lib/i386/libnpjp2.so /usr/lib/mozilla/plugins/


use vi editor to insert newline char in replace

Something else I have to do and cannot remember and then have to look up.

In vi to insert a newline character in a search and replace, do the following:

:%s/look_for/replace_with^M/g

the command above would replace all instances of “look_for” with “replace_with\n” (with \n meaning newline)

to get the “^M”, enter the key combination “ctl-V” then after that (release all keys) press the “enter” key.

Add a Field to Salesforce.com Web-to-Lead form

I often have to modify a site that uses Salesforce.com for their form handling, and it can be quite a lot to keep in one’s head sometimes. It also is difficult to explain to someone else in a mail or over the phone when you need them to do something for you, so I am going to start posting here each explanation I give out. One day maybe I will have a simple guide to the basics of Salesforce.com

Today’s task is to add a couple of fields on a form, as well as adding these to the salesforce database and confirmation emails etc. Here we go.

login to salesforce.com
choose setup (upper right corner)

first step is to add the new fields to the database, adding a check box for Mon and Tues in this case, and I use a special prefix and name scheme for fields I create, so these will look like MyPrefix_AvailableMon and MyPrefix_AvailableTues. Note the actual prefix is different in my case, and should be as the others are, which will be obvious when looking at them

under app setup (on left side) open Leads
choose fields
scroll down to “Lead Custom Fields & Relationships”
choose New
choose type (checkbox in the case of the days of the week to add)
choose next
enter a label and name (MyPrefix_AvailableMon/MyPrefix_AvailableMon and MyPrefix_AvailableTues/MyPrefix_AvailableTues in our ccase)
choose next, then next again, to complete, accepting the defaults
choose save, or if making more “save and new”

Next we will get the HTML for the new controls to add to the TFK site

under App Setup again, on the left, under leads, choose web-to-lead
choose the button in the middle of the screen “create Web-to-lead”

hi-light any fields in the box “Selected Fields” and use the arrow to the left of the box to move them out of selected and back to “available fields”

Next scroll down in the available fields and choose your new fields, hi-light them then use the arrow button to the right to move your new fields to the “selected fields” box

then choose the “generate” button in the middle of the page, below the two boxes you have been working in

Scroll down and copy only the HTML elements for the two new fields you created. In our case these look like this:

MyPrefix_AvailableMon:<input id="00N50000001yAWZ" name="00N50000001yAWZ" type="checkbox" value="1" /><br>

MyPrefix_AvailableTues:<input id="00N50000001yAWa" name="00N50000001yAWa" type="checkbox" value="1" /><br>

and save this text, you will need to add it to the form on the site with the forms later.

next we need to add the new fields to the mails that come to us and the confirmation mails that go to the person that filled in the form

on the bar on the left, under “Personal Setup” choose “My Templates”

choose edit next to the email template that you wish to add the field to. These are related to the page you wanted to add the field to. There are two templates for each page, one for the mail to us, with all the data, and one that is a confirmation to the person filling in the form. In this case it is for a “volunteer signup” to choose now.

Choose “edit”, next to the signup page template

You will see a somewhat cryptic way they add the fields to the form, for instance the other days of the week are show like:

Wed: {!Lead.MyPrefix_AvailableWed__c}

so there is this !lead. before our field name. and the __c afterward. We can just copy this for our purpose of adding just a couple new fields, and these end up like:

Mon: {!Lead.MyPrefix_AvailableMon__c}
Tues: {!Lead.MyPrefix_AvailableTues__c}

choose save

Then choose edit next to the confirmation page for the signup page, and add the same fields to that page as you did above.

That is all for salesforce.com. Next edit the HTML form on your site that submits to the Salesforce.com web-to-lead page and add the two fields you saved a while back

These as you will recall looked like:

MyPrefix_AvailableMon:<input id="00N50000001yAWZ" name="00N50000001yAWZ" type="checkbox" value="1" /><br>

MyPrefix_AvailableTues:<input id="00N50000001yAWa" name="00N50000001yAWa" type="checkbox" value="1" /><br>

but you might want to change the label, add styles etc. to match the page, so just remember to keep the id and name as you have got from the web-to-lead generation page.

Get PS to display the complete path (on Linux)

Something else I can never remember and waste time looking up is how to display long long long paths when looking at processes with “ps”. Well just a couple of “W” does the trick.

ps -auxww

More on why, later but wanted to put it down while it was fresh

Determine if a String is XML using Java and Regular Expressions

So again I am posting something I have to do every now and then and have to spend time, each time, to check the pattern or usage etc. for.

Once in a while, in an app that does not do much XML, and therefore is not already using an XML parser of some kind, will need to at the least, determine if a String is XML. With a pretty simple Regular Expression, it is possible using plain old Java and without using any specific XML technology.

I know there are other references out there for doing this, but it is here below as a code sample, for my easy reference and maybe it will help someone else out, who knows. Enjoy.

Are we XML (like) data? :

import java.util.regex.Pattern;
import java.util.regex.Matcher;


public class test {


    /**
     * return true if the String passed in is something like XML
     *
     *
     * @param inString a string that might be XML
     * @return true of the string is XML, false otherwise
     */
    public static boolean isXMLLike(String inXMLStr) {

        boolean retBool = false;
        Pattern pattern;
        Matcher matcher;

        // REGULAR EXPRESSION TO SEE IF IT AT LEAST STARTS AND ENDS
        // WITH THE SAME ELEMENT
        final String XML_PATTERN_STR = "<(\\S+?)(.*?)>(.*?)</\\1>";


        // IF WE HAVE A STRING
        if (inXMLStr != null && inXMLStr.trim().length() > 0) {

            // IF WE EVEN RESEMBLE XML
            if (inXMLStr.trim().startsWith("<")) {

                pattern = Pattern.compile(XML_PATTERN_STR,
                Pattern.CASE_INSENSITIVE | Pattern.DOTALL | Pattern.MULTILINE);

                // RETURN TRUE IF IT HAS PASSED BOTH TESTS
                matcher = pattern.matcher(inXMLStr);
                retBool = matcher.matches();
            }
        // ELSE WE ARE FALSE
        }

        return retBool;
    }


}/**/

Do a retroactive branch in CVS

You have a source tree that is not branched, and you suddenly need to get a previous version (maybe it is in production at that point, but the trunk has moved on since and is waaaaaaaaaaaay out of sync). What to to? Well if you could branch from back then, back in time to that revision …. well you get the idea, and I am calling this a retroactive branch, because instead of the branch being a the current revision or HEAD, it is from some date/revision/point in the past.

This is something that I sometimes find I must do with CVS but seems to be a bit of an obscure function, as there are not a lot of posts about it online. Therefore I am going to post about it here.

Here are the steps, I use, to do a retroactive branch in CVS.

1) Checkout using the tag for the previous revision that you want to start
a branch from.

for example:

    cvs co -r MY_TAG_V01-1 com/example/myapp/build.xml

2) Find out the date according to CVS for the tagged revision
I use “cvs log” to see the date of the tagged revision I wanted

for example:

  cd com/example/myapp/
  cvs log build.xml

In the result I see that my revision for this tag was 1.4 and the date was:
1970/01/01 01:00:00 (this is UTC I assume)

If your doing a bunch of files, then find the most recent date and use that. You can find a date that is older than the most recent date in the files you want to retro branch, and not as recent as any next revisions and use that.
3) Add a branch tag based on the date
an example, for one file:

    cvs tag -D "1970-01-01 01:00:00+00" -b branch_tag build.xml

or for many files:

    cvs tag -D "1970-01-01 01:00:00+00" -b branch_tag build.xml

That is it. Whala. In your favorite cvs app you should see your a new revision history for your source tree. I use ViewCVS and after doing these steps on a file in the source tree, then navigating to that tree and using the "Show files using tag" select control, I can see my "branch_tag" tag and chosing that tag to view by, I see a whole new revision history for my test file.

cvs update -r branch_tag updates only the new revision with the sub-revision

editing the source just given a new branch and commiting again creates new sub-revisions,

for example:

cvs commit
cvs commit: Examining .
Checking in build.xml;
/var/lib/cvsroot/com/example/myapp/build.xml,v  <--  build.xml
new revision: 1.4.4.1; previous revision: 1.4
done

Apache XMLBeans – output XML without a namespace

This is again something that I need to know how to do but never remember how when time it tight.

Apache XMLBeans http://xmlbeans.apache.org/ is a great tool for working with XML in Java, but it requires the XML Schema being used to create the objects from XML to have a Namespace. The namespace ends up being part of the package structure for the Objects created and I guess having a unique path for these is a good idea. However, this requirement can be a bit of a pain, when working with some simple XML structures that do not have a namespace. Especially when your ready to persist the XML Bean objects to XML source. If a namespace is added to your XML Schema that the XML Bean objects are created from, XML source generated from them will by default also have the namespace. I can never remember how to output the XML source without a namespace and so I am writing it down here where I can get at it with a click, and maybe this will help someone else as well.

There are two key steps to remove the Namespace when outputting XML Source.

  1. Tell it to use the default namespace:
           xmlops.setUseDefaultNamespace();
       
  2. Tell it that you have already declared the default namespace:
           dnsMap.put("", "http://example.com/schemas/DefaultNnameSpace");
           xmlops.setSaveImplicitNamespaces(dnsMap);
      

After this, you can output as normal:

      xmlops.setSavePrettyPrint();
      xmlops.setSaveNamespacesFirst();
      retString = myXMLDoc.xmlText(xmlops);
      return retString;

Note: the research and testing to solve this was done using XMLBeans v2.4.0

set up a Debian Linux machine to handle UTF-8 in a shell or console app

To set up a Debian Linux machine to handle UTF-8 in a shell or console app do the following.

First, use dselect or whatever tool you like to find the Japanese font packages for X and install em.

Then run

  dpkg-reconfigure locales

then choose en_US.UTF-8

Test by executing the folowing in a shell:

  locale charmap

it should say

UTF-8

If not try just

  locale

it should have UTF-8 for everything like:

LANG=en_US.UTF-8
LANGUAGE=en_US:en_GB:en
LC_CTYPE=”en_US.UTF-8″
LC_NUMERIC=”en_US.UTF-8″
LC_TIME=”en_US.UTF-8″
LC_COLLATE=”en_US.UTF-8″
LC_MONETARY=”en_US.UTF-8″
LC_MESSAGES=”en_US.UTF-8″
LC_PAPER=”en_US.UTF-8″
LC_NAME=”en_US.UTF-8″
LC_ADDRESS=”en_US.UTF-8″
LC_TELEPHONE=”en_US.UTF-8″
LC_MEASUREMENT=”en_US.UTF-8″
LC_IDENTIFICATION=”en_US.UTF-8″
LC_ALL=en_US.UTF-8

if not then Add the follwoing to .bashrc and re-source it (e.g. get a new login shell, or execute bash)

  export LC_ALL="en_US.UTF-8"

then try

locale charmap

or

 locale

once that is all set to UTF-8 then change your shells (xterm, rxvt) to use:
uxterm
urxvt

That is it. I had to exit X11 and re-login to get X11 to take these settings
so that clicking my icon for xterm launched uxterm WITH the correct environment

After this all console apps that can handle UTF-8 (like vim) display UTF-8
characters correctly.